Home Automation 家居自動化

It has been almost a year since I moved into my current apartment. Apart from daily household chores, the introduction of home automation has taken up most of my time. And the story begins with the pendant lights in the living and dining rooms.
The wiring for this set of lights was a bit strange. It was controlled by a single switch, meaning that even when I wanted to turn on the dining room light, the living room light would also come on at the same time. Not only did this waste energy, but it also resulted in excessive brightness in the apartment. Instead of asking electrician to rewire the setup, I decided to install a smart light bulb that could be controlled independently using a remote or a mobile app. During my study, I came across Home Assistant, an open-source home automation system, and kicked off my journey into automation.
Looking at it from another perspective, I’ve also set foot on an irreversible path!
搬入現時居所差不多一年了,這段日子除了日常家居打理外,花得最多時間可算是引入家居自動化這個概念。 而故事就是從客、飯廳的吊燈開始。
這組燈的線路有點怪,是由單一按鈕控制開關,即使食飯開燈亦要同時亮着客廳的燈,浪費電力之餘亦令屋內過份光亮。 與其找電工重新鋪線,我選擇了安裝一個 Smart light bulb,可以用遙控或手機 App 作獨立開關。 在資料搜集期間,我第一次遇上 Home Assistant 這個 Open Source 家居自動系統,亦正式開始了自動化之旅。
換過另一角度來看,也從此走上一條不歸路!
With its rich and powerful product features, Home Assistant is one of most popular home automation platforms. As there are so many discussion forums dedicated to Home Assistant in addition to its official website, I will share with you my experiences rather than repeating those implementation details.
Home Assistant 這個系統功能強大,極受一眾用家歡迎,除了官方網站外,亦有很多 forums 及 tutorials 教導如何安裝、設置各式各樣的自動化項目,與其再重覆,我倒不如分享一下這一年來自已的體驗。
Choosing an appropriate hardware platform is a key step of Home Assistant implementation. My first attempt was using a Raspberry Pi 3B+, which delivered an energy efficient platform and without requiring any active heat dissipation device. However, as the scale of automation increased, the system gradually gone into unstable state due to lack of memory resources. I once planned to switch to an Intel NUC, but in view of the higher power consumption and annoying noise of its cooling fan, I inevitably dropped the idea and finally moving the platform to my extremely precious Raspberry Pi 4B. Why so precious? Cos’ it’s out of stock all over the world !
With the much faster processor and the enormous 8GB of RAM, my Home Assistant server ran lightning fast. I recently upgraded the built-in Micro SD Card with a 256 GB SSD which took the server performance to the next level. Remember to take this option in your own server setup.
設置 Home Assistant ,第一步當然是選擇系統平台。手頭有好幾塊 Raspberry Pi,早期是安裝於一塊 Raspberry Pi 3B+,効果頗不錯,耗電量低,亦不需特別的散熱裝置。 不過隨著自動化項目增加,這塊只得 1 GB memory 的 SBC 因在資源不足的情況下,不斷自行啟動。 曾經考慮過改用另一部 Intel NUC,但因為較高的耗電量及散熱風扇惱人的聲浪,我還是放棄這個念頭,改用我珍蔵的 Raspberry Pi 4B,何解珍蔵呢?皆因全球缺貨,更被高價炒賣!
在這塊 Raspberry Pi 4B 內置較高速的處理器及 8 GB RAM 下,Home Assistant 運行得無比𣈱順,最近我更為它加配了 256 GB SSD,取代了原來的系統 Micro SD Card,運行速度更上一層樓,如果你要安裝 Home Assistant 的話,切記這個配置。


With the server in place, the next logical step was to acquire some sensors like smart light bulb, power socket, temperature/humidity and door/window monitor to supplement the setup. After some research works, I noticed that the sensors market was almost taken up by manufacturers in China. Those products are mainly developed and operated under the China owned Tuya cloud platform, which give rise to security concerns in certain extent. My advice is never use cloud platform to operate the sensors but stick to local management with Home Assistant.
Another area of consideration is whether to use Zigbee or Wifi for communication with sensors. I preferred to use Zigbee or the latest Threads over Wi-Fi for its lower power consumption. However, be aware that Zigbee/Threads sensors are more expensive and with limited variety available in the current market.
有了系統平台,下一步就會購買一些智能家居裝置如燈泡、電源插頭、開關制、溫度計、濕度計及門窗監察等的傳感器音器。 做了一輪資料搜集後,竟發覺這個市場差不多已被中國的廠家所佔據,而這些傳感器產品更主要是以國内 Tuya 雲端平台開發及運作控制,在資訊保安考慮下,確實存在一定風險!在可能的情況下,我會建議不要使用雲端控制模式,改以 Home Assistant 作本地運作。
另一個要考慮的是用甚麽無線網絡去與傳感器要交換資料,我傾向選用功耗較低的 Zigbee 或新一代的 Threads Network 多於 Wi-Fi,不過支援前兩者的傳感器價錢較高,產品亦相對少。


With over a month of learning, I finally got a basic working home automation system spanning across lighting control for living and dining rooms, temperature/humidity monitoring for bathrooms. In view of UK’s humid weather, I had a humidity monitor sensor dedicated for the piano too. With some automation works in place, the piano dry bar will be turned on or off subjected to the detected humidity. Finally, to allow for better control, I also customised a number of dashboards.
經過個多月的學習,終於建立了一個基本的家居自動化系統,燈光控制部份用於客、飯廳及睡房;温度及濕度監察則主要包括兩個浴室,而因應英國潮濕環境,我更特別為家中鋼琴加入濕度監察,自動開關防潮管。 為方便掌握系統狀況,我更加入數個客製化的 Dashboards。


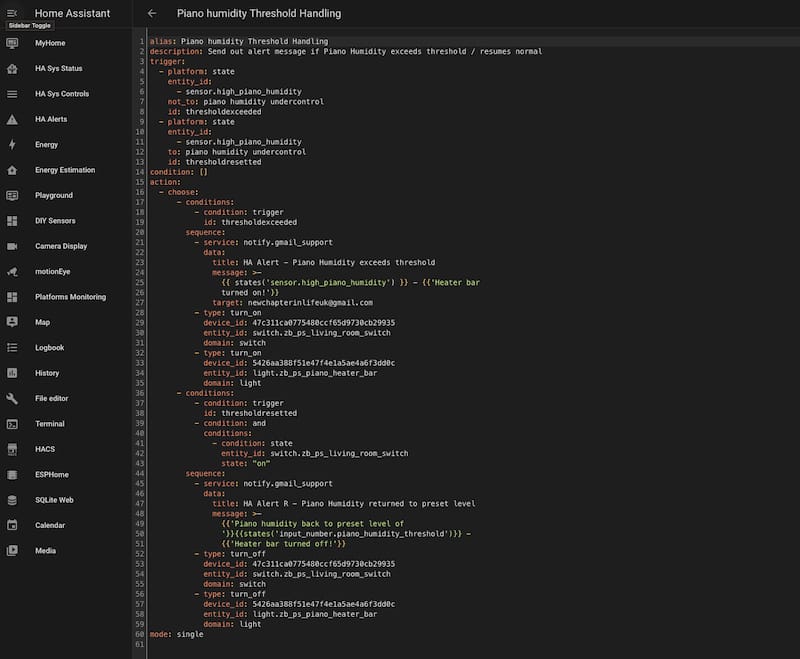
Technologies behind Home Assistant are relatively new to old school IT guys like me and extra efforts must be paid in order to grasp it. The first is YAML (Yet Another Markup Language) which served as the basis of Home Assistant configuration and sensor definition. Despite some of these setup can now be made through Graphical Interfaces in later release of Home Assistant, there are still some complicated setups that can only be handled with YAML.
Home Assistant 系統所使用的技術,對於我這類老派 IT 人來説相較陌生,要努力學習才能勉強撑握一二。 第一個要面對是 YAML (Yet Another Markup Language),無論是系統 configuration 或 sensor definition 都以此為基礎,雖然隨着 Home Assistant 的發展,這些 setup 續漸已可透過更友善的 Graphical Interfaces 來完成,但較複雜的 customisation 仍需使用 YAML。

The second one needed to be addressed is Python. The Home Assistant Core and a number of the add-on modules are written in Python. In case you had problems with Home Assistant or encountered system issues, a good understanding of Python should help in reading the system source codes. And in case you would like to develop your own add-on modules, knowledge of Python will definitely be an advantage.
第二個新的挑戰是 Python。Home Assistant 的核心或好一些附加擴展模組都以 Python 編寫,當遇上一些問題或系統錯誤時,認識 Python 可令你瞭解系統 source codes,對解決問題有一定的幫助。 而要開發自已的擴展模組的話,掌握 Python 編寫亦是有絕對的需要。

Another technology that is extensively used in Home Automation is MQTT. MQTT is a lightweight messaging protocol that facilitates the exchange of messages between different automation platforms and sensors. In the context of Home Automation, it helps the controlling server to retrieve data from sensors and send operation commands to change the way the sensors operate.
Home Assistant comes with an official Mosquito MQTT Broker that can be optionally installed. With some simple broker configuration and YAML based sensor definition, the required connection between the sensor and Home Assistant server can be easily established.
另一個我覺得非常有用的技術是 MQTT。 MQTT 是一個輕量級 messaging 協議,可為不同的系統平台或傳感器互相交換訊息,當用於 Home Automation 的範疇下,可收集傳感器的資料或送出控制指令來改變運作。
Home Assistant 已内附一個可自行選裝的官方 Mosquitto MQTT Broker 模組,透過簡單的 broker configuration 及以 YAML 為基礎的傳感器 definition,便可定義新的傳感器及建立與系統間所需的連繫。


Once I got some ideas on these technologies, I quickly kicked off some small projects to test my knowledge and skill. As it happened that energy crisis became the prime concern in UK at that time, my monthly household energy bill stayed high despite price cap and energy bill support scheme were in place. Other than the gas hob, everything else in my home run on electricity. If I can monitor the power consumption of each electrical appliance at home, I should be able to adjust the usage or modes appropriately to achieve the goal of cost saving.
As not every type of electrical appliance can readily provide power consumption statistics, I have categorised all my electrical appliances into three groups:
- Fully smart devices or those connected to a smart socket that can provide accurate power consumption data
- Smart devices that only provide on/off state
- Regular non-smart devices without any state display
The first group can be directly monitored by Home Assistant, while energy usage for the second group can be calculated based on its equipment state using YAML definition. Finally, the third group can only be estimated through YAML definition. The last two groups rely on accurate energy measurement during normal usage and having a good Power Meter is definitely helpful.
After several months of operation and continuous adjustments, the current estimation of power consumption has reached an accuracy of approximately 90%.
學了一點點這些技術後就嘗試找些小型 projects 來測試自己能力,剛巧英國有 energy crisis ,即使政府有限價及保貼,每月 energy bill 仍然高企。我家除了煮食爐是用 gas 外,其餘的都是以電力驅動,如果能監察家中各電器用電量,便能適當地調整用量或使用模式以達致慳錢目標。
由於並非每一種電器都能自動提供用電量,我就把家中電器分成三類:
- 全智能裝置或已接駁至 Smart Socket 並兼備真實用電量數據
- 智能裝置只提供即用狀態,如開或關
- 一般非智能裝置且無任何狀態顯示
第一類可以可直接由 Home Assistant 去監察,而第二類可透過 YAML definition 就其狀態去計算用量,最後第三類則只可以 YAML definition 去估計用量,後兩者都需要有真實使用時的功率數值作依據,一個準確 Power Meter 就絕對有幫助。
經過數個月的運作及重覆的修正,現時的用電量估計而差不多達到 90% 準確度。


For Python programming and MQTT, I have developed a simple system resource monitoring program on my Apple Mac M1 Mini. It periodically sends data via MQTT messaging to my Home Assistant Platform Monitoring dashboard.
在 Python 程式編寫及 MQTT 方面,我就在我的 Apple Mac M1 Mini 寫了個簡單的系統資源監察程式,定時透過 MQTT messaging 發放至 Home Assistant 的 Platform Monitoring dashboard。

After acquiring some experience in home automation, you may want to explore automation projects that off-the-shelf sensors may not provide. Developing your own sensors using microcontrollers can be a viable option. Although it can be challenging, it should be an excellent opportunity for learning.
Since I have been using the Raspberry Pi family, the first microcontroller came to mind is the Raspberry Pi Pico Wireless. There are several development platforms available and the most popular choice being the Arduino IDE based on C++. However, as I intended to focus on Python, I have opted for MicroPython (a microcontroller optimised version of Python) with the Thony platform. Other than some differences in libraries, the programming development process is basically the same.
My customised Raspberry Pi Pico Wireless served as multipurpose sensor that delivered temperature, humidity, passive infrared (PIR), and magnetic capabilities. The microcontroller published collected data to Home Assistant via MQTT messages at regular intervals for display and backend processing.
Don’t ask me the purpose of my sensor. My goal was simply to familiarise myself with MicroPython and the operation of MQTT messaging.
對 Home Automation 有了一定的經驗後,你或許想就自己的需要建立特定的自動化項目,但坊間可買到的傳感器未必可提供你所需的功能,利用 Microcontroller 開發自家的傳感器便是一個方法,雖然難度不少,但這挑戰亦絕對是另一學習的好機會。
因為一直用開 Raspberry Pi 系的產品,第一個想到要用的 Microcontroller 便是 Raspberry Pi Pico Wireless。 開發平台有好幾個選擇,較受歡迎的是以 C++ 為基礎的 Arduino IDE,但因我想集中學習 Python ,所以找來專為 Microcontroller 作優化之特別版本 MicroPython 平台 Thony。 除了Libraries 有所不同外,程式開發工作大致一樣。
試行開發是一個集温度、濕度,被動紅外線(PIR)及磁力計功能的多用途傳感器,Raspberry Pi Pico 定時會把各個收集到的數據經由 MQTT messages 傳送到 Home Assistant 作顯示及啟動後台的處理。
不要問有甚麽用途,我的目標只是熟習 MicroPython 及 MQTT messaging 的運作。


The Raspberry Pi Pico Wireless is a relatively new microcontroller. The built-in Bluetooth functionality was just launched earlier this year but still pending from support in various development platforms, making its deployment somewhat limited.
I also found another China made microcontroller called ESP32. With its powerful features and affordable price, the microcontroller was already deployed extensively by manufacturers all over the world in automation products. For the sake of testing, I purchased several of these ESP32 microcontrollers, which included camera modules, built-in flashlights, and the ability to add external antennas for enhanced signal reception. In terms of development platforms, I am using the MicroPython/Thonny combination as well.
Raspberry Pi Pico Wireless 是個較新的 Microcontroller ,其中的 Bluetooth 功能年初才正式推出,但仍有待各開發平台的支援,暫時算是有點失色。
在資料搜集階段卻發現了另一 Microcontroller,國內開發的 ESP32,由於功能強大兼且價錢低廉,國際市場上已有很多廠家以它製做出各式各樣的自動化產品。 我亦特別購入數塊這些 ESP32 Microcontrollers,支援攝錄鏡頭,內置閃光燈,更可加入外置天線增强訊號接收力,而在開發平台方面,我同樣使用 MicroPython / Thony 這個組合。


Nabu Casa, the developer of Home Assistant, has another open-source project called ESPHome. Through simple configuration files, ESP8266 (the previous generation) and ESP32 microcontrollers can be defined/controlled without any programming. I have also tried using it for developing some of my ESP32 sensors.
Which platform is better? I believe there is no definitive answer!
Personally, I find ESPHome to be powerful and user-friendly, making it the preferred choice for development. However, it currently lacks support for SD card usage. If you need to store/access data on SD card, you still need to write custom code. Furthermore, ESPHome tends to rely on Home Assistant’s built-in services to fulfil certain functionalities of ESP32 microcontrollers, which inevitably increase the communication traffic between the system and the sensors. As such, careful consideration should be taken when choosing your development platform.
開發 Home Assistant 的 Nabu Casa 有另一個 Open Source project,ESPHome,主要是透過簡單的 Configuration file 去定義及控制 ESP8266 (上一代的 ESP32) 及 ESP32,免卻程式編寫,而我亦曾嘗試用於部份傳感器的開發。
那個平台較佳?我覺得沒有絕對答案!
個人覺得 ESPHome 功能強大,簡單易用,是開發之首選,但因暫時仍欠缺 SD Card 的支援,如果你需要利用 SD Card 存取資料,你仍需編寫程式。 另外 ESPHome 偏向使用 Home Assistant 內置的服務去完成部份 ESP32 microcontroller 的功能,間接增加了系統與傳感器間的通訊流量,選擇開發平台時要多加考慮。


Since I am not a certified electrician, I am not allowed to install Energy Meter into my household Consumer Unit (Switch Box / Fuse Box). Instead, I have to find other non-intrusive solutions to monitor my actual electricity usage. I decided to use a camera equipped ESP32 microcontroller to upload images of my electricity meter to my Home Assistant server on an hourly basis. By using the Pillow and Tesseract Python libraries for image recognition, I then converted the figures into numerical data for subsequent proceeding.
Program development is almost completed and fine tuning works on camera focusing and flash light are in progress. Live testing will be conducted in coming few weeks. One more thing needs to be considered is the amplification of the Wi-Fi signal as the ESP32 will be placed in a closet outside my flat. Anyway, just leave this after the initial testing.
因為我沒有電工牌照,未能為家中 Consumer Unit (Switch Box / Fuse Box) 安裝智能 Energy meter,要掌握家居真實用電量的話只好採用另一類非侵入性的安案。我現時打算利用一個有 Camera module 的 ESP32 microcontroller,每一小時拍下電錶的讀數並上傳至 Home Assistant,再利用 Pillow 及 Tesseract 等 Python libraries 作圖片識別並轉換成數據來處理。
所需程式已差不多寫好,現階段正為 camera module 的 focusing 及閃燈作調教,預計未來數星期可作初步測試,而另一個可能要花點功夫的是 Wi-Fi 訊號的放大,不過還是留待測試後再決定。


This post seems a little bit long but if you are interested in having some automation projects for your home, feel free to contact me for information or work together to tackle these projects.
今次這個 post 有點長,如果你有興趣為自己做些家居自動化的項目,你可以找我一起研究。
Copyright © MyNewChapterInLife / MyNewChapterInLife/mynewchapterinlife.blog, 2023
All Rights Reserved.Unauthorized use and/or duplication of this material without express and written permission from this site’s author and/or owner is strictly prohibited. Excerpts and links may be used, provided that full and clear credit is given to ‘MyNewChapterInLife’ and ‘MyNewChapterInLife/mynewchapterinlife.blog’ with appropriate and specific direction to the original content.


No enemy la (無敵)
嘩,唔好咁誇張,我仍是一個見習生咋 😅