Home Automation – My 2025 Update 智能家居計劃 – 2025 年回顧

It’s been almost two years since my last post about setting up my home automation system. Since then, aside from the normal tweaking of those dashboard layout, I’ve added a few special features that I think are worth sharing!
距離上次那編關於建立我的家居自動化系統的 post 後已差不多兩年,除了基本的 Dashboard 調整外,亦加入了數個較特別的選項,可以同大家分享。
Smart Meters Installation 智能電表安裝
I’ve been using Co-op Energy as my energy supplier ever since moving into my current apartment, though all billing and customer service is actually handled by their partner, Octopus Energy.
Back in 2010, the UK government launched the Smart Meters rollout, aiming to upgrade the country’s energy infrastructure by replacing traditional electricity and gas meters with smart ones. These meters automatically send usage data to the supplier — no more crawling under the stairs or closet to read meter readings or dealing with estimated bills. For the actual equipment replacement, each energy company handles the installation works for its own customers.
In June 2023, it was finally my turn.
Along with the electricity and gas smart meters, Octopus also provided an In-Home Display (IHD), a handy device showing real-time energy usage and cost at a glance.
現時居住的 apartment 一直是使用 Co-op Energy 作為能源供應商,而收費及客戶服務則由其合作夥伴 Octopus Energy 提供。
英國政府在 2010 年推動 Smart Meters 計劃,目標是以智慧電錶取代傳統的燃氣表和電錶來更新國家能源基礎設施。透過 Smart Meters,能源使用數據會自動發送至供應商,無需人工讀錶和估算帳單,而硬件安裝則由個別能源供應商為其客戶安排。
2023 年六月終於輪到我的住所。
除了電力及煤氣的 Smart Meters 外, Octopus Energy 亦提供了一個家用顯示器 (IHD),提供即時的能源使用情況和成本資訊。


Dashboards for Recent Pass Energy Usage and Historical Data Trend Analysis 能源使用總覽及趨勢分析
Using the IHD, one could easily keep track of both real-time and accumulated electricity and gas usage, along with automatic cost calculation — it really was convenient. But over time, things changed. As my wife put it, “Every time you glance at that screen, it just feels like we’re spending more money!”. What started as a helpful tool gradually became a source of stress. So, we did the obvious—switched it off!
Another shortcoming of the Octopus Energy-supplied IHD is the lack of any Application Programming Interface (API) support. That meant I couldn’t pull live usage data to display it on our dashboards or trigger automation based on it. That limitation led me to start building my own energy usage data extractor.
Although Octopus Energy doesn’t officially support a Home Assistant Integration, I came across an unofficial one created by the Home Assistant community. It’s surprisingly powerful and can pull in various data points like usage and costs. However, the version I first installed only offered data up to the previous day — which was a bit disappointing.
To get real-time or near real-time readings, I had to dive deeper into how Smart Meters report their data in the UK.
Here’s how it works: All data collected from Smart Meters is first sent to a government-appointed body called the Data Communication Company (DCC). The DCC then distributes it to the relevant energy suppliers — like Octopus Energy, EDF, and so on — as well as to the various network operators. Many energy suppliers offer official APIs to access this information, and the Octopus Energy integration I mentioned earlier relies on such an API.
However, since energy companies need to manage heavy data processing tasks like billing and usage forecasting, they usually only offer usage and cost data from the previous day. That’s why neither the Octopus APIs nor its integration with Home Assistant can provide up-to-the-minute readings.
One way around this previous-day limitation is to bypass the suppliers entirely and go straight to the source: the DCC.
Now, DCC is a heavily regulated government entity, and Smart Meter data is highly protected that regular users can’t just tap into it. That said, a few authorised companies and developers have been granted access to limited portions of this data. One of them is Hildebrand, and I’ve been using their official API to fetch the readings I need.
As of late 2024, over 30 million smart meters are in use across the UK. With such a massive data load to process, it’s no surprise there’s a noticeable time lag in data availability from the DCC. Based on my observations over the past year or so, the delay is typically at least 60 minutes, but can stretch up to a full day under extreme conditions.
To handle this delay, I built a Python script that includes an automatic retry mechanism—this ensures the most recent and accurate data is eventually retrieved. Once the data is pulled, the script sends it to Home Assistant via MQTT. I then display it alongside the previous day’s data from the Octopus Energy integration on a custom-built Energy Consumption Dashboard.
透過 IHD,即時及累積電力及媒氣使用量變得一目了然,更可自動計算相關收費,確是方便。不過日子久了,情況就變得不一樣,正如太太所講,「每看一眼就覺得錢用多了」,原本的方便慢慢轉化成壓力,最後當然是把它關掉!另外 Octopus Energy 提供的 IHD 最大問題是欠缺程式接口 (API),令你無法取得即時使用量去作展示或作自動化的安排。基於這個不足之處,我決定開發自已的能源使用數據的抽取程式。
雖然 Octopus Energy 並沒有提供任何的 Home Assistant Integration,但從 Home Assistant Community 找到一個非官方的 Octopus Energy Integration,可以讀取能源使用量,收費等相關資料,強能強大,但最初安裝的版本只能提供早一天的資料,有點美中不足。
如果要取得即時或較近期的使用量,就一定要瞭解 Smart Meters 的數據收集基礎架構。
在英國,所有 Smart Meters 收集到的數據會先傳送到一個政府指定機構 – Data Communication Company (DCC),再分別發放到相關的 energy suppliers 如 Octopus Energy、EDF 等以及其他 Network Operators。而很多 energy suppliers 亦會提供官方的應用程式介面 (API) 以讀取資料,之前提過的 Octopus Energy Integration 就是利用了 Octopus Energy 的官方 API。由於 Energy Suppliers 要為用戶的收費及預測使用量等工作而需要處理大量的數據,一般來說都只會提供一日前的用量、收費等資訊,這亦解釋了為何 Octopus Energy 的 APIs 及 Home Assistant Integration 未能提供即時資訊的原因。
要繞過這些局限的其中一個方法就是直接讀取 DCC 的 Smart Meter 數據 !
DCC 是受政府監管的機構,而從用戶收集到的 Smart Meter 數據是完全保密,一般人無法接觸。但亦有個別公司、程式發展商獲得授權,能讀取一小部分的用量數據,Hildebrand 就是其中之一,我就是利用了 Hildebrand 的官方 API 去讀取所需數據。
直至 2024 年尾,全英國已有超過三千萬個 Smart Meters 在運行中,由於需要處理的數據量非常龐大,現時 DCC 發放的使用量及收費資料亦出現了較明顯的滯後 (time lag) 現像。就我過去一年多的觀察,滯後時間最短約 60 分鐘,而在極端情況下甚至可以長達一天,考慮到這個滯後問題,我自行開發的 Python 程式,已加入了自動重試讀取的邏輯,確保可取得最新、最近期的數據。
程式取得所需數據後便經 MQTT 傳送到 Home Assistant,再加上 Octopus Energy Integration 的前一天數據一起顯示於特別為 Energy Consumption 所寫的 Dashboard。

I also developed another Python script that uses the Octopus Energy’s official API to collect our household’s daily energy usage data and store it in an InfluxDB time series database. With custom InfluxDB queries on the Grafana platform, I can now generate detailed analytics on both our usage and costs — basically, establishing an Energy Usage Profile for our home.
This profile allows me to simulate what our bills would look like under different service plans. So whenever an energy supplier claims their new plan can save me money, I can test it against our actual usage pattern to see if the savings can actually be achievable!
此外我亦開發了另一個 Python 程式,利用 Octopus 的官方 API 收集我家每一天的能源使用數據組,存入 InfluxDB time series database 內。透過在 Grafana 平台上特別而寫的 InfluxDB queries,提供詳細的能源使用量及收費分析,從而推斷出我家的 Energy Usage Profile。有了這個能源使用量的模型,我便可模擬在不同的 service plans 下的對應收費,有助我衡量 energy supplier 提供的各種 service plans 是否可以真的可以減省我的開支!

Octopus Home Mini – Realtime Energy Usage Monitoring 即時能源使用量監察
In mid-2023, I joined the beta testing programme for the newly launched Octopus Home Mini by Octopus Energy. The goal of the trial was to gather feedback from early users to help refine the device’s features and performance.
The Octopus Home Mini is a small hardware device that connects to your home’s smart meters and sends real-time energy usage data to the Octopus Energy app and the online portal — essentially serving the same purpose as the IHD (In-Home Display). But the real game-changer is that this live data can also be accessed via Octopus Energy’s official API and integrated into the Octopus Home Assistant Integration.
One thing to note: electricity data updates every 10 seconds, offering near-instant insight. However, due to design limitations of the gas smart meter, gas usage updates only every 30 minutes. Still, it’s a massive improvement over having no live data at all!
2023 年中,我參與了 Octopus Energy 剛推出的 Octopus Home Mini Beta 測試計劃,其目標是透過早期用戶的回饋,從而可進一步優化 Octopus Home Mini 的功能與效能。
Octopus Home Mini 是一個小型硬件裝置,可以連接到家中的 Smart Meters,將即時的能源使用數據傳送到 Octopus Energy 的應用程式中及上載至 Octopus Energy 的 Online Portal,功能上一如 IHD。不過最重要的是這些即時數據亦可經官方 API 提取及反映在 Octopus Home Assistant Integration 上。
要留意的是電力使用數據是每 10 秒更新一次,但基於煤氣 Smart Meter 的設計所限,煤氣使用數據則只會每 30 分鐘更新一次。

With just a few tweaks to my original Energy Dashboard, I was able to integrate real-time energy usage and cost data directly into the Home Assistant system — essentially replicating (and even enhancing) the functionality of the IHD.
Best part? These real-time figures can now be used for home automation, like triggering a high electricity consumption alert whenever usage spikes. Handy for keeping tabs on those power-hungry appliances before the bills get scary!
只需稍為修改原先的 Energy Dashboard,加入即時能源使用量及收費數據便可把 IHD 的功能完全嵌入 Home Assistant 系統內,有需要的話更可利用這些即時數據作其他自動化之用,例如製作一個
高耗電量警示 (High Electricity Consumption alert)。

I’ve heard that the beta programme has now ended, and Octopus Energy is starting to offer the Octopus Home Mini for free to new customers who have Smart Meters installed.
Looks like what began as a limited test is now rolling out to more households — great news for anyone looking to level up their energy monitoring without extra cost!
據聞這個 Beta 計劃已經完結,Octopus Energy 會免費提供 Octopus Home Mini 給新的 Smart Meters 用戶。
Octopus Energy Agile Plan Migration Octopus Energy Agile 方案切換
Using the Energy Usage Profile I built earlier, I ran a comparison between our current Co-op Flexible (a fixed-rate tariff), Octopus Eco-7 (a dual-rate or Economy 7-style plan), and Octopus Agile, to see which tariff plan would work out cheapest without changing our existing usage patterns.
Agile, in particular, is one of Octopus Energy’s more innovative dynamic pricing plans. The electricity cost changes every 30 minutes, based on real-time wholesale market prices in the UK. Each evening, the rates for the following day are published, allowing customers to plan their energy usage more strategically.
透過早前建立的 Energy Usage Profile,我比較了使用中的 Co-op Flexible ( 固定費率 ),Octopus Eco-7 ( 雙時段電價 ) 及 Octopus Agile 能源收費計劃,看看在不改變用電模式下那種收費最化算。
Agile 是 Octopus Energy 的一種較創新的動態電價方案,電價每 30 分鐘會根據英國電力批發市場的價格波動而調整,並於每日傍晚公布下一天的價格表。

Here’s what I found after nearly a year’s observation:
- Eco-7: Turned out to be the most expensive overall. On average, our monthly bill was 15–20% higher than the Co-op Flexible plan. The main reason? The rates other than the Off-peak period were significantly steeper than Flexible’s standard rate, and most of our usage falls within those hours.
- Agile: This one was cheaper overall, with monthly bills averaging 10–20% lower than Co-op Flexible. But there’s a catch — winter months can be pricey. When wholesale electricity prices spike and our usage goes up, some months actually ended up more expensive than the Flexible plan.
Last August, I officially switched over to Octopus Agile, and over the past eight months, the results have been pretty encouraging. During the winter months, I still managed to save around 8% on electricity costs, despite the higher usage and spiking market rates. As for the rest of the year, the savings were even better — about 20% on average. All in all, I’m expecting an annual saving of roughly 16%, which isn’t bad at all for just changing a tariff!
以差不多一年的觀察期,我得出以下結論:
- Eco-7 : 平均月費最高,較 Co-op Flexible 約高出 15 – 20%,主要原因是除了非繁忙時段(Off-peak)外,電價反比 Flexible 高很多。
- Agile : 平均月費較 Co-op Flexible 低 10 – 20%,不過因冬天電力批發市場價格飆升,再加上用電量高,個別月份會高於 Flexible plan
去年八月我正式轉用 Octopus Agile,在過去的八個月,冬天月份電費約節省 8%,而其他月份則約 20%,預計全年應可省下 16%,算是不錯。

Homemade Energy Monitoring (Electricity) Sensor 自家製作電力使用量感測器
Although the Octopus Home Mini gives a pretty good overview of real-time household electricity usage, it doesn’t offer any breakdown of individual appliances or circuits. If you want that kind of detail, the most effective way would be to install dedicated energy meters on selected circuits inside the Consumer unit (Fuse box).
That said, I’m not a licensed electrician, so I can’t legally modify the consumer unit myself. And hiring a registered electrician to do a full upgrade isn’t on the cards anytime soon. So, as a compromise, I decided to monitor energy usage by installing meters on individual power sockets and extension leads—specifically, the ones used by my 24/7 home server farm and home office setup.
There are plenty of ready-made products on the market that do this sort of thing, but hey — where’s the fun in that? For a bit of DIY adventure, I went with a homemade solution.
The parts list? It’s not too crazy: an ESP32 microcontroller, a Voltage Transformer, a pair of Current Clamps, an interface board, and of course, some online project resources to piece it all together.
雖然即時家居總電力使用量可經 Octopus Home Mini ,但對個別電器或電路仍無法提供詳細用量數資料,而要取得相關數據,最有效的方法就是在配電箱( Consumer Unit )為需要的電路加入 Energy Meters。由於我沒有電工牌照,不可自行更改配電箱,短期內亦不會找註冊電工去進行改善工程,一個折衷方法就是為個別電源插座或電源延長線安裝 Energy Meters。
市面上亦有頗多類似產品作選擇,不過為了挑戰平淡的人生,我決定要自行製作,目標就是家中 7/24 Server Farm 及 Home Office 的兩組 Socket / 電源延長線。
所需零件包括 ESP32 微控制器,Voltage Transformer,Current Clamps 及配線板,當然還有網上找來相關的 project work 資料。


The hardware setup wasn’t particularly difficult — just some careful wiring and soldering. But where I really had to roll up my sleeves was in the software side of things, especially with ESPHome configuration, dealing with Custom Components, and fine-tuning the EmonLib library settings.
It definitely took a bit of trial and error to get everything calibrated and reporting accurately, but that’s part of the fun, right?
硬件的安裝不算太困難,只是在 ESPHome 軟件配置,Customer Component 與及 EmonLib 定義設定方面要花點工夫!

This Energy Meter setup using ESPHome had been running smoothly — until the release of ESPHome 2025.1.0 earlier this year. With that update, support for the old Custom Components was officially dropped. So naturally, when I tried to update the ESPHome config, it threw a bunch of errors.
The fix? I had to rewrite the Custom Component as External Component — not the most glamorous task, but hey, it’s a good excuse to clean up some legacy code and learn the updated architecture while I was at it!
這組 Energy Meter 的 ESPHome 配置一直運作正常,不過隨著年初的 ESPHome 2025.1.0 升級,舊有的 Customer Component 支援已被淘汰,當更新其 ESPHome 的定義設定時就會產生錯誤,解決的方法就是把原先的 Customer Component 改寫為全新的 External Component。


There isn’t a lot of support or online documentation for the ESPHome External Components, so it took me a few days of trial and error to finally get the rewrite working. It was a bit of a deep dive — but the sense of achievement after getting everything up and running again made it totally worth it.
網上對於 ESPHome External Component 的支援不太多,花了數天時間終於把這個改寫攪妥。

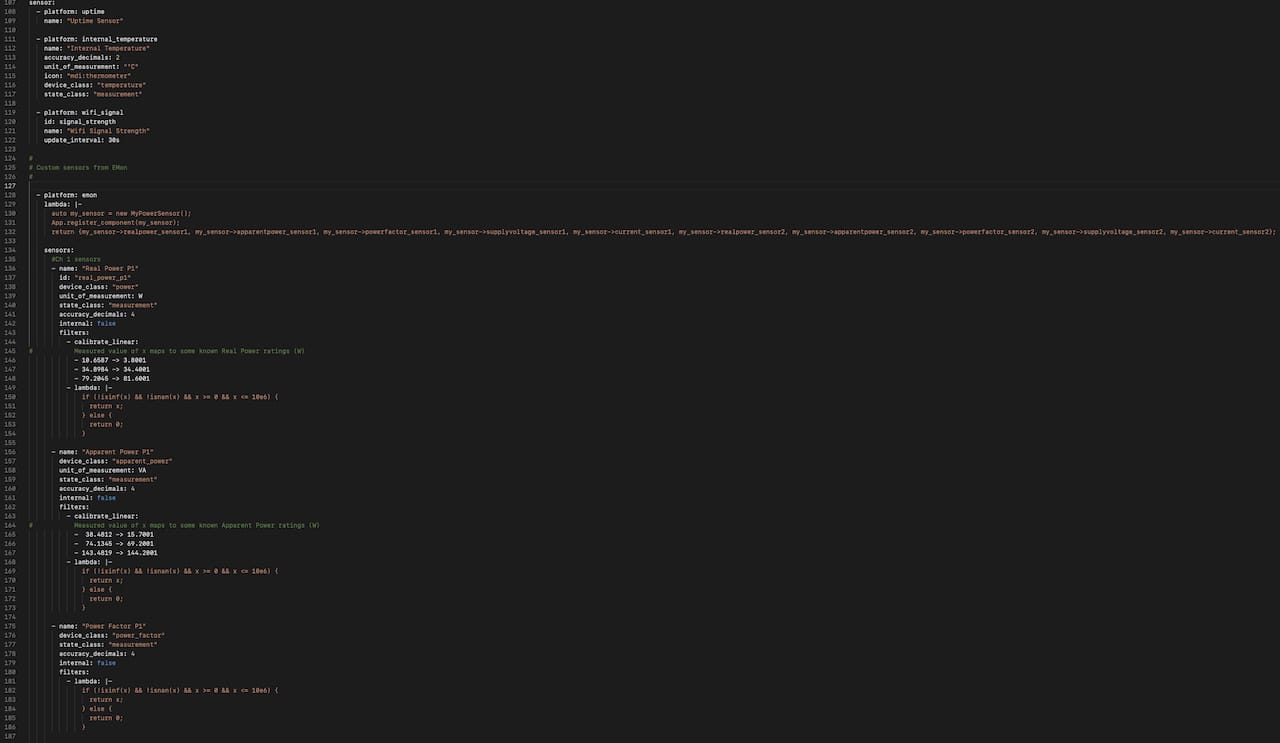
In the original esp32emon.h source code, there were two code segments responsible for calculating real-time electric power, but they were quite time-consuming and ended up blocking the ESPHome main processing loop from handling other tasks. To avoid dragging down the overall efficiency, I eventually rewrote those calculation routines to run asynchronously.
原本的 esp32emon.h 程式內有兩段計算即時 electric power 的 code segments 運作需時,會引致 ESPHome 的 main processing loop 無法處理其他工作,為免影響整體效率,我最後亦把這些計算用的 coding 改寫成非同步運作。

Home Assistant Platform Migration Home Assistant 伺服器平台遷移
Home Assistant isn’t exactly a resource hog, and for a good while, it ran just fine on my trusty Raspberry Pi 4B single board computer. Everything looked smooth… until it wasn’t. The system would randomly hang up that the only solution was to reboot the entire setup. This is not a total disaster when I was around, but when I was travelling, it became a real headache.
I once suspected the Pi’s power supply might be the culprit. After all, it’s a common issue. So I swapped in a beefier Raspberry Pi 5 power adapter, hoping that would fix it. No luck — the hang-ups kept happening.
Meanwhile, the Intel NUC that’s been hosting this very WordPress blog, has been running non-stop, 24/7, for over a year without a single crash. Not once. Maybe x86 systems are just inherently more stable? Either way, that got me thinking…
So, in January, I took the plunge. I migrated my entire Home Assistant system over to a new mini PC powered by a Ryzen 5825U — a serious upgrade with over 20 times the processing muscle of the Pi. Along with the hardware shift, I also transitioned from the all-in-one Home Assistant Operating System (HAOS) to a Docker container setup.
The migration process? Not too painful. Most things transferred over smoothly. The only real work came from having to re-install and reconfigure a few addons using their Docker equivalents. A little fiddly, but nothing unmanageable.
Now, with Ryzen power and Docker flexibility, my Home Assistant setup is not only faster and more stable — it finally feels bulletproof.
Home Assistant 對硬件的要求不高,在我的 Raspberry Pi 4B Single Board Computer 上運作得非常暢順;話雖如此,這個組合一直都有個問題,就是系統會經常性地突然當掉( Hang Up ),需要重新起動整個系統。一般情況下都不算是大問題,但當發生在我遠行時就不一樣了。追查了很久亦找不到甚麼頭緒,曾經懷疑過是 Raspberry Pi 的供電問題,亦嘗試過更換更大電流及功率的 Raspberry Pi 5 外接電源供應器,但當機問題仍未能解決!
環顧正運行這個 WordPress Blog 的另一台 Intel NUC,在過去一年,每天 7 x 24 運作,卻重未發生異常當機,可能是 x86 系統穩定性較高的原故。今年一月終於把整個 Home Assistant 系統遷移至一部新添置,具備二十多倍處理效能的 Ryzen 5825U 微型 PC 上,同一時間亦把 Home Assistant 從 Home Assistant Operating System (HAOS) 版本改為虛擬化的 Docker Container 版本。遷移工作尚算簡單,只是個別原先配置的 Addons 要另行安裝相對應的虛擬化 Container 版本,稍為需要花多一點功夫。

Copyright © MyNewChapterInLife@UK / MyNewChapterInLife/mynewchapterinlife.blog, 2025
All Rights Reserved.Unauthorized use and/or duplication of this material without express and written permission from this site’s author and/or owner is strictly prohibited. Excerpts and links may be used, provided that full and clear credit is given to ‘MyNewChapterInLife’ and ‘MyNewChapterInLife/mynewchapterinlife.blog’ with appropriate and specific direction to the original content.


好勁呀! 完全唔明,剩係知好勁,和好深!